I love chocolate bark and it’s not just because I love chocolate. I love it because the finished product looks and tastes amazing and yet it is so simple to make. In fact, it does not require any actual baking. Thus, making it a great recipe for someone who has just started to find their way around the kitchen. It is also great for the beginning baker because the overall appearance is supposed to be a little rough and rustic. It does not require the finesse and detail of say a decorated layer cake or more intricate pastries. Another aspect of chocolate bark that makes it so amazing is how incredibly versatile it is. You can really use any combination of chocolate and toppings that you want based on your preferences and the occasion. It is great arranged on a platter for a simple dessert or placed into cello bags with a decorative ribbon for a festive gift.
For me chocolate bark is all about creating contrast. Contrasting flavors and contrasting textures. If I am using a very sweet chocolate, such as white chocolate I like to pair it with something salty such as pretzels or salted nuts. If I am using a more bitter chocolate such as dark chocolate, I like to pair it with something sweet such as butterscotch chips or marshmallows. Also important is the contrast in textures. Most barks are topped with nuts or other crunchy item, I like to pair these with something soft such as dried fruits or marshmallows.
First, you need to choose your chocolate. It is important to realize that not all chocolate is the same. Different brands offer different types and qualities of chocolate and melting chocolate really shows off the imperfections. Therefore, your favorite chocolate chips that you use for cookies, might not necessarily be the best option for this. When it comes to choosing chocolate for melting, I recommend using organic chocolate. In general, I am not one for preaching the benefits of organic anything. There are plenty of other websites, cookbooks, and articles out there that already do that. But I will say that I prefer organic when choosing a chocolate for melting for one simple reason: it’s easier to work with.
A lot of conventional chocolates, especially chocolate chips, have stabilizers and additives to help them hold their shape while baking. These additives tend to get in the way when to trying to melt chocolate. In my experience when trying to melt conventional chocolate, especially white chocolate, it tends to separate and become almost waxy. However, when I started using organic chocolate, I started getting much better results. The chocolate melted silky, smooth, and shiny.
Ideally, when purchasing chocolate for melting you would buy chocolate bars rather than chocolate chips or chocolate chunks. Unfortunately, these chocolate bars cost more per ounce than chocolate chips or chocolate chunks. Therefore, whenever I am making a recipe that calls for a lot of melted chocolate, I gear it towards the more economical choice of chips or chunks. In this particular recipe you will see that I am using Organic Dark Chocolate Chunks and Organic White Chocolate Chips.
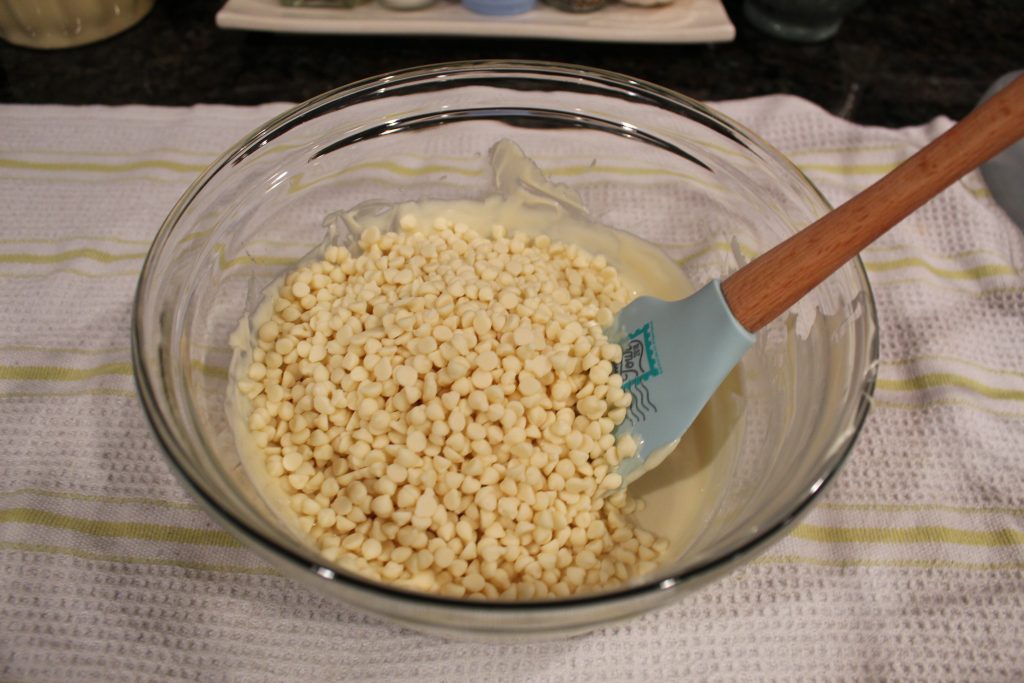
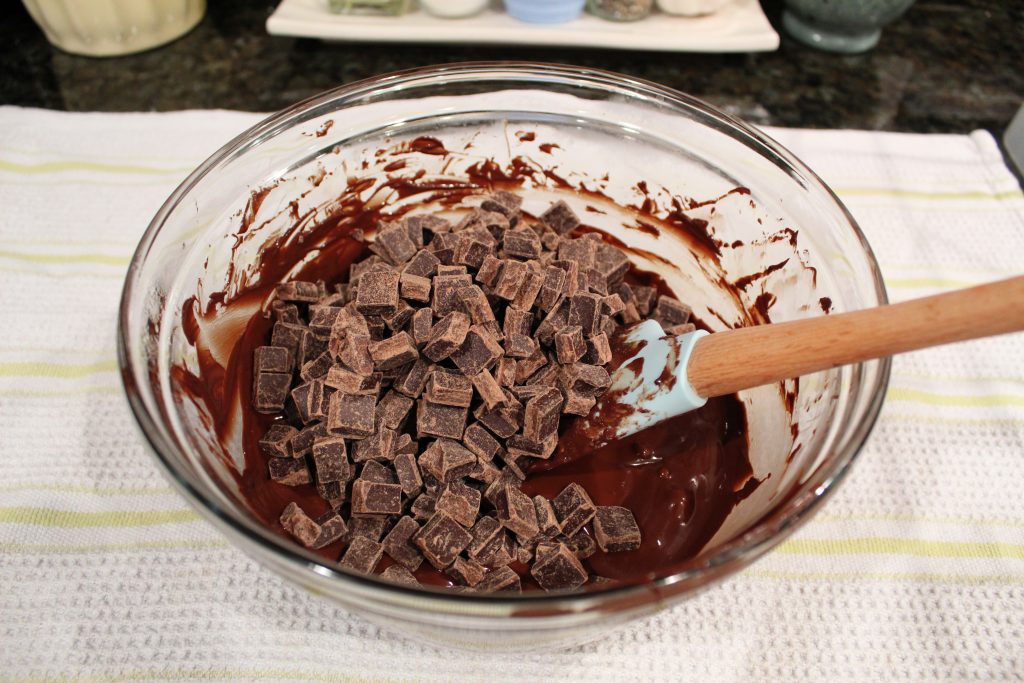
So now that you have selected your chocolate you need to melt it. The process of melting chocolate is also known as tempering. Tempering is essentially the process of raising the chocolate to a certain temperature so that it melts completely, and then cooling it down so that it keeps a smooth texture and shiny appearance. A serious candy maker would know the exact temperatures required for tempering chocolate and would have a candy thermometer to closely monitor the temperature of the chocolate as it is melting. But since the average home baker does not know these temperatures off the top of their head and may or may not even have a candy thermometer on hand, I use a shortcut that I picked up from years of watching Ina Garten on Food Network. Take half of your chocolate and melt it, more on how to melt chocolate in a moment. Once half of the chocolate has completely melted remove the bowl from the heat source and add the other half of the chocolate. Then stir continuously until the other half of the chocolate has melted. The chocolate that you just added will melt from the residual heat of the melted chocolate while simultaneously bringing down the temperature of the previously melted chocolate, thus tempering it.
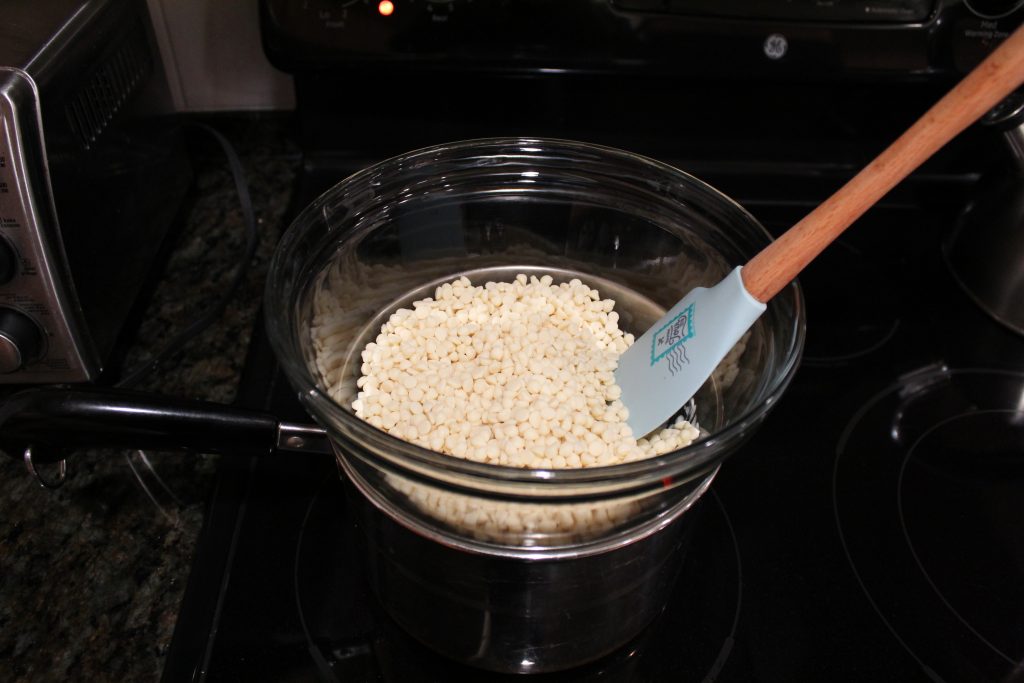
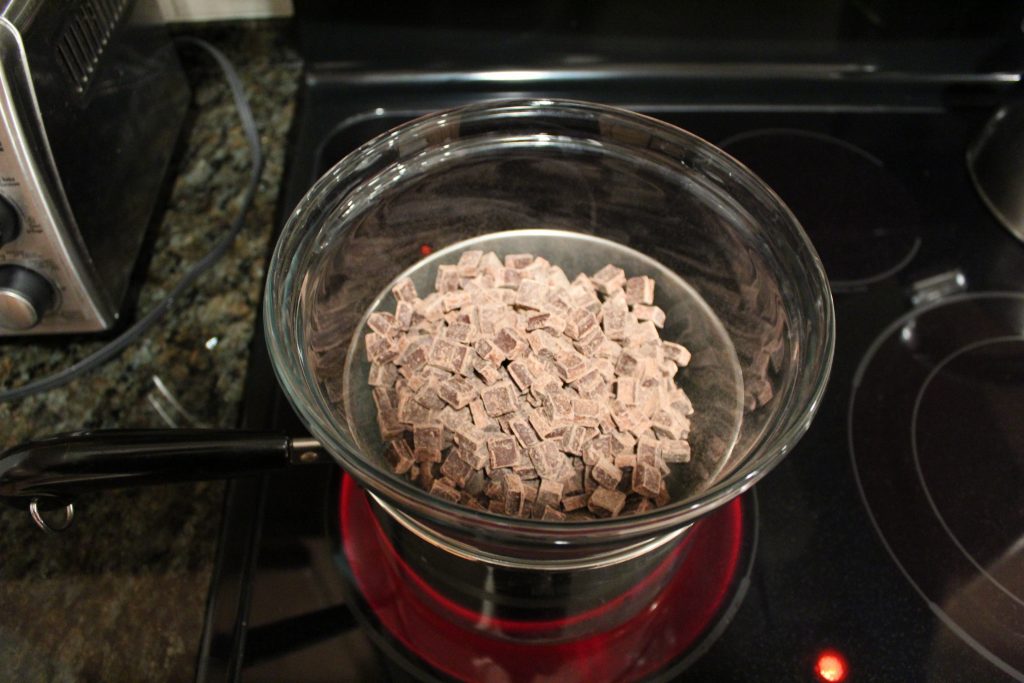
While we are on the topic of tempering chocolate, let’s talk about your two options: Microwave or Double Boiler. To melt chocolate in the microwave, place the chocolate in a microwave safe bowl and put in the microwave for 30 seconds. After 30 seconds remove the bowl, stir, and return to the microwave for another 30 seconds. Repeat this process until the chocolate has completely melted. The other option is to melt the chocolate in a double boiler. For a double boiler you will need a pot of simmering water and a bowl that can fit on top of the pot while still leaving some space between the bottom of the bowl and the water. It is very important to use a bowl that is made from a heat proof material such as Pyrex. The last thing you want is an explosion of glass halfway through melting your chocolate. Once the water is simmering place the chocolate in the bowl stirring occasionally until it is completely melted.
Once the first half of the chocolate has melted you will remove it from the either the microwave or the double boiler and add the other half. Stirring until all of the chocolate has melted. If you are having difficulty getting the second half of the chocolate to melt you can return it to either the microwave for another 15 seconds or the double boiler for 30 seconds. I find that this is often necessary for the white chocolate in particular.
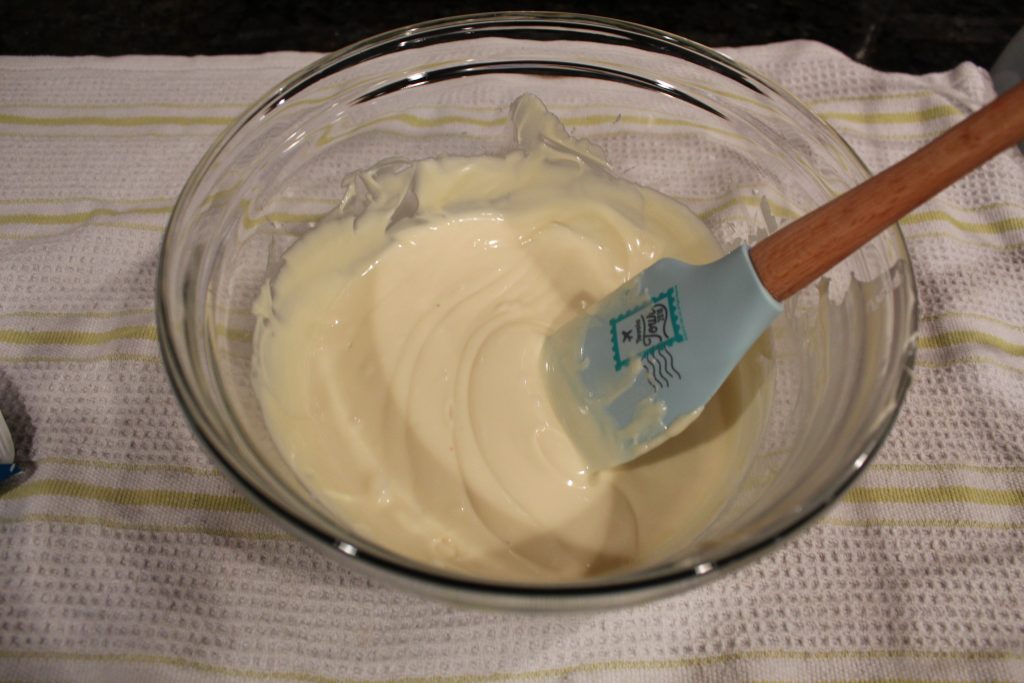
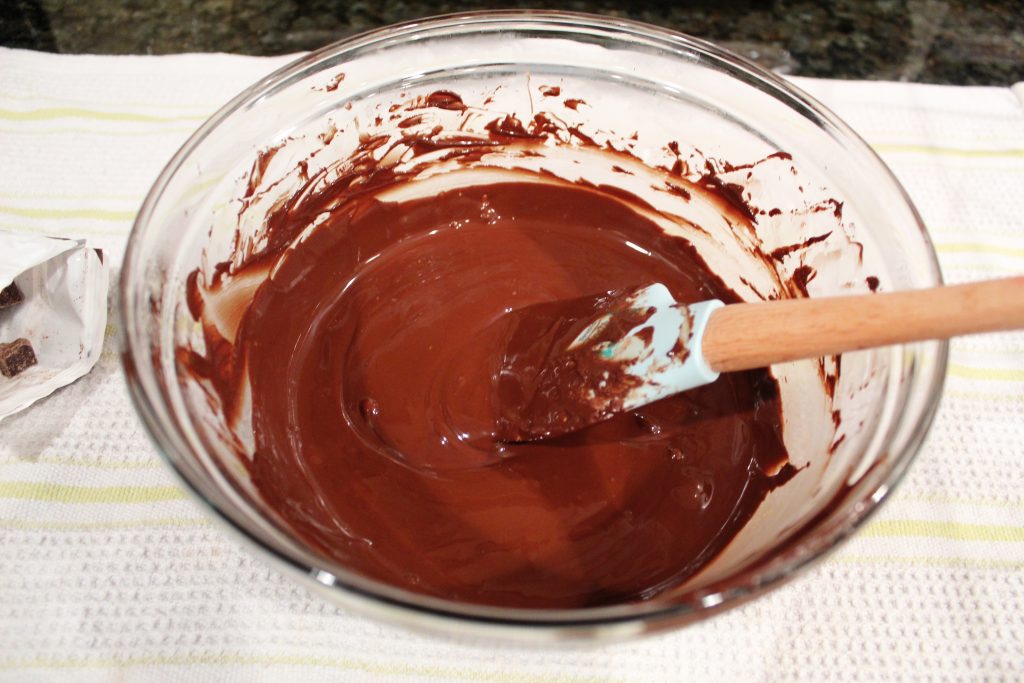
Ultimately, both methods will give you the same result: tempered chocolate. Not surprisingly the double boiler is a slightly more time-consuming process. However, I tend to prefer it over the microwave method, especially for large quantities of chocolate, because I feel that it offers more control over the melting process.
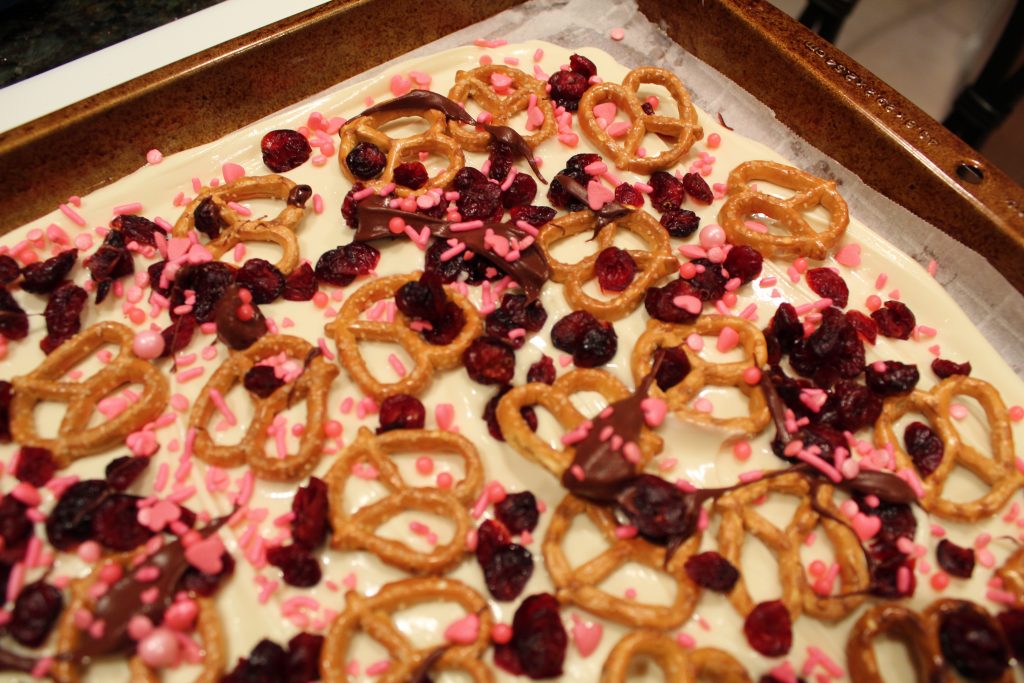
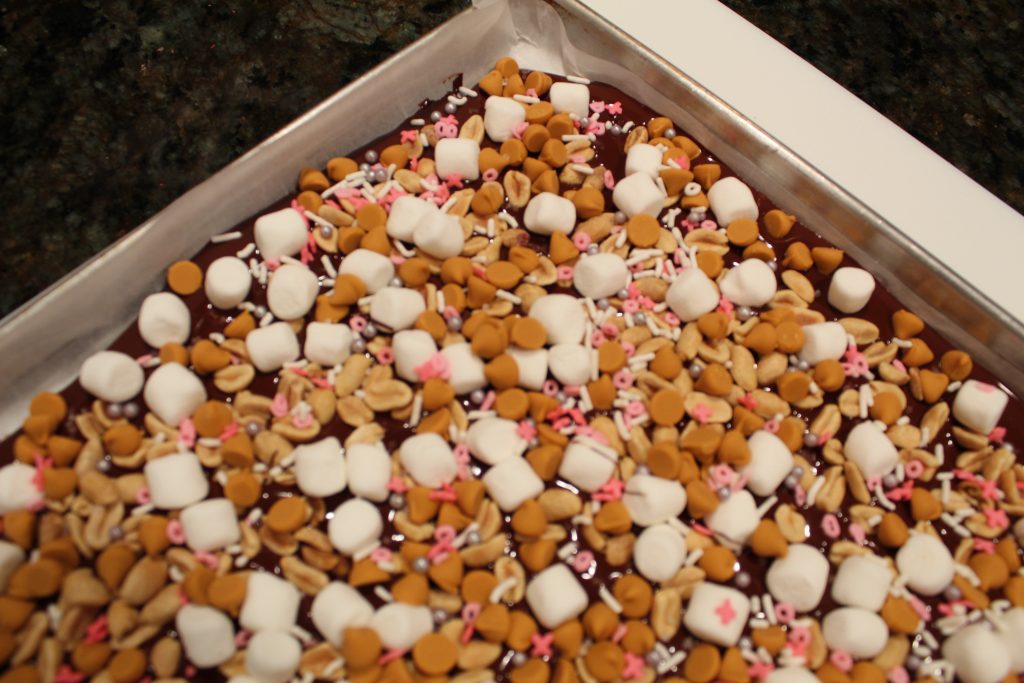
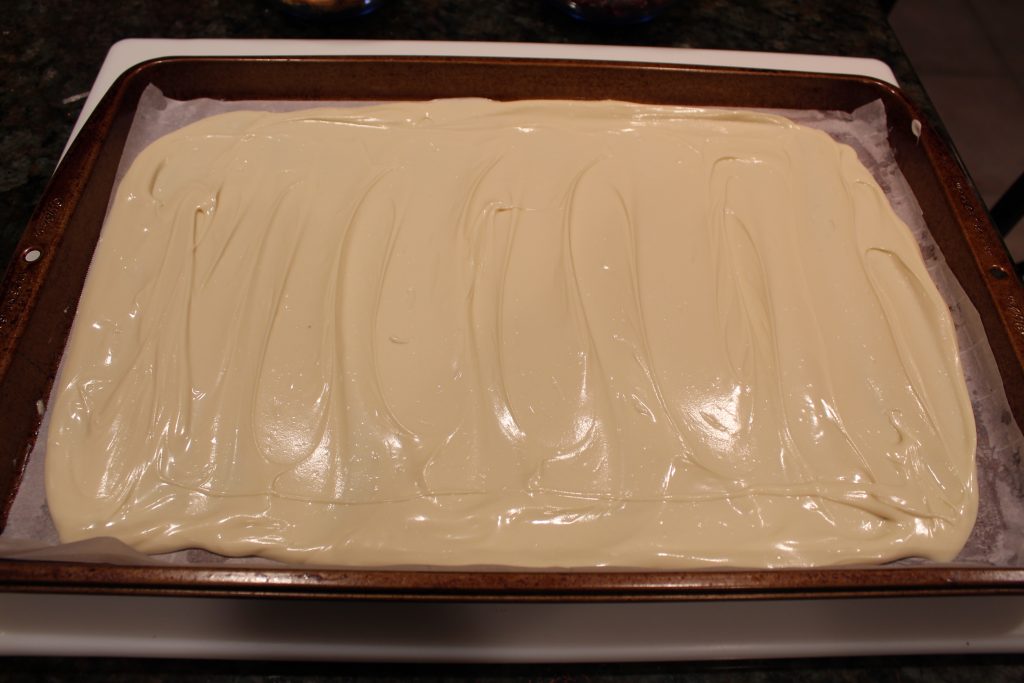
Once the chocolate has been tempered you will want to work with it quickly before it starts to set. Immediately pour it out on to a parchment lined baking sheet and spread it into an even layer using an offset spatula.

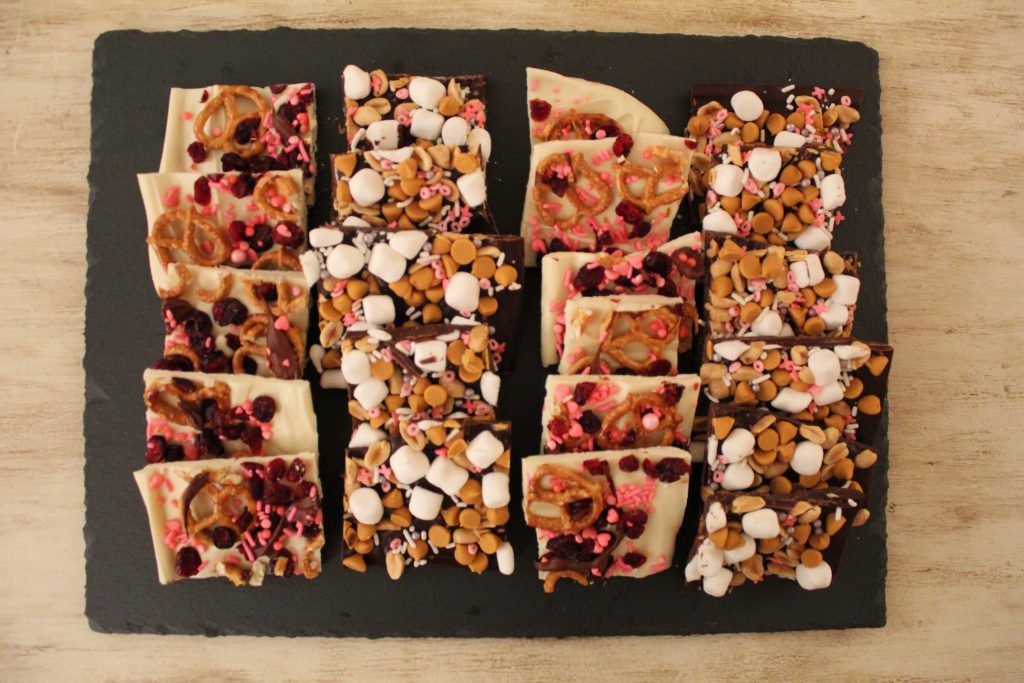
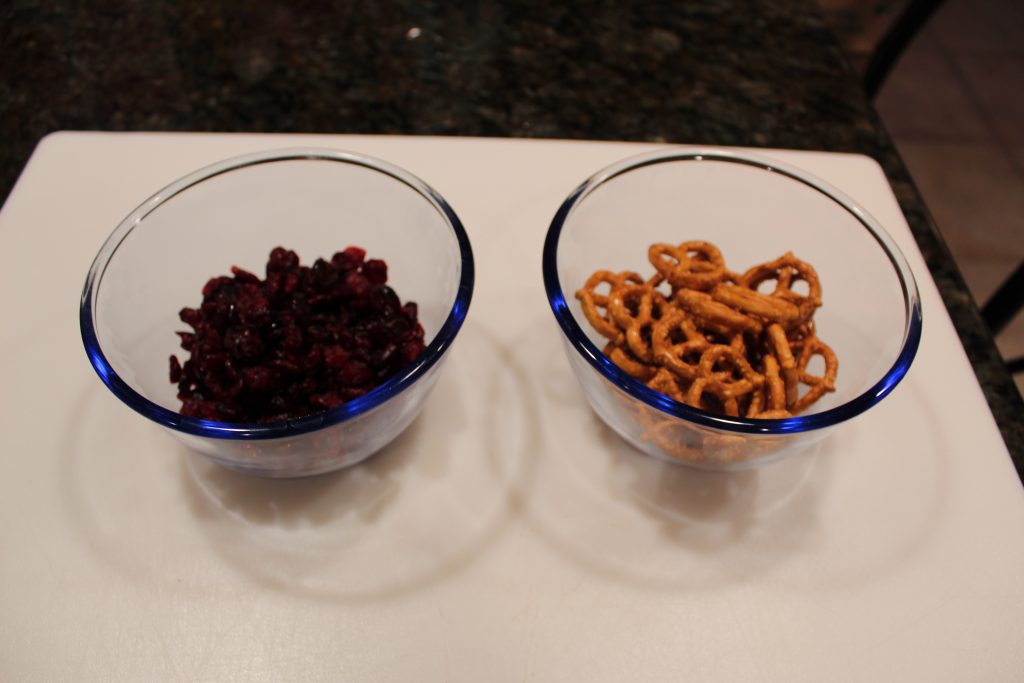
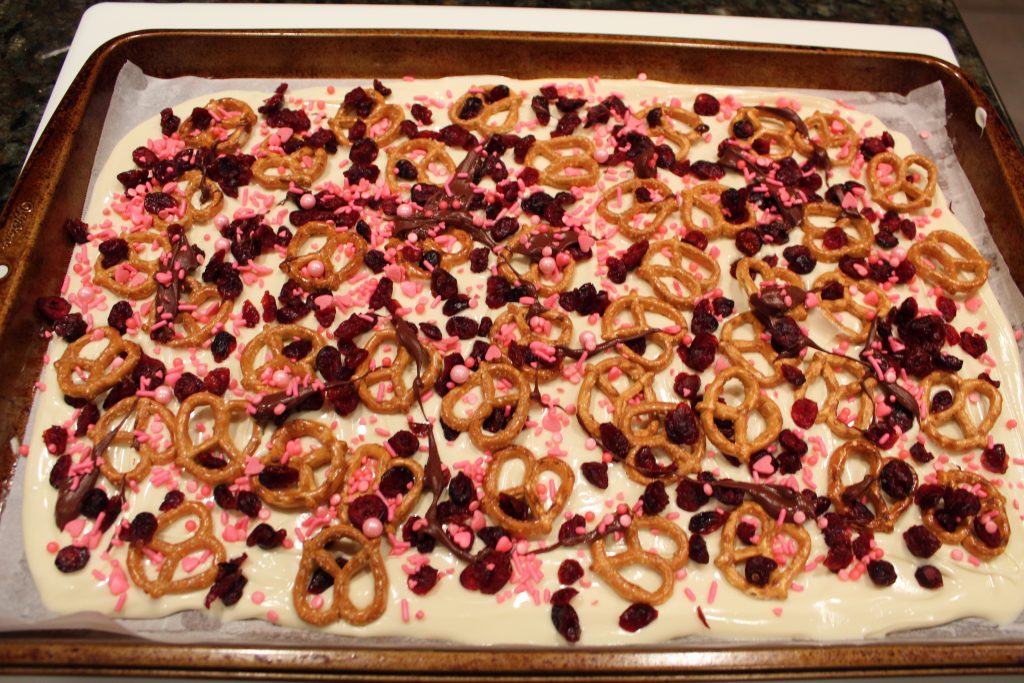
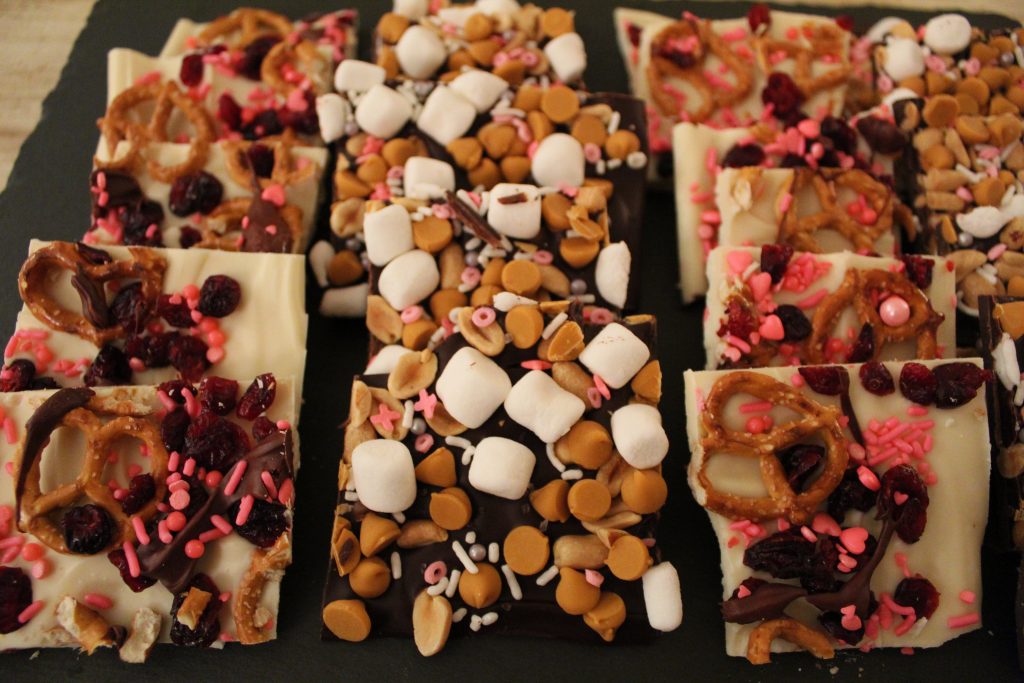
Then evenly sprinkle over your chosen toppings. For these barks I chose two different types of toppings for the different chocolates. The white chocolate I used salted pretzels and dried cranberries. Both are a good contrast for the sweet white chocolate. The pretzels bring a nice saltiness and the dried cranberries add a needed tartness. The toppings also complement each other well. Where the pretzels are hard and crunchy, the cranberries are soft and a little chewy.
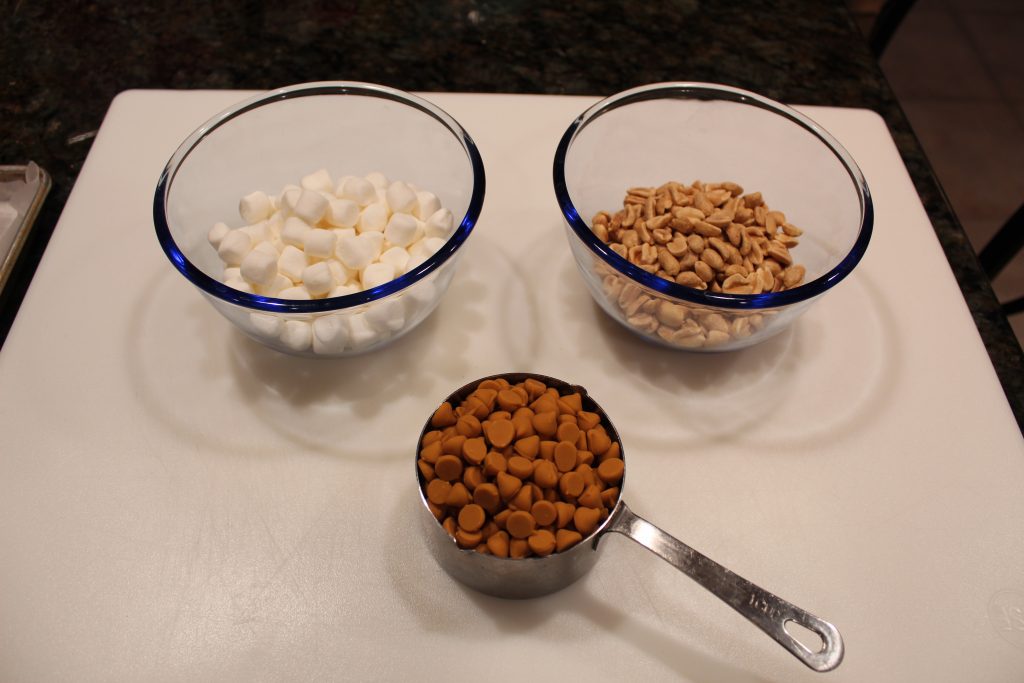
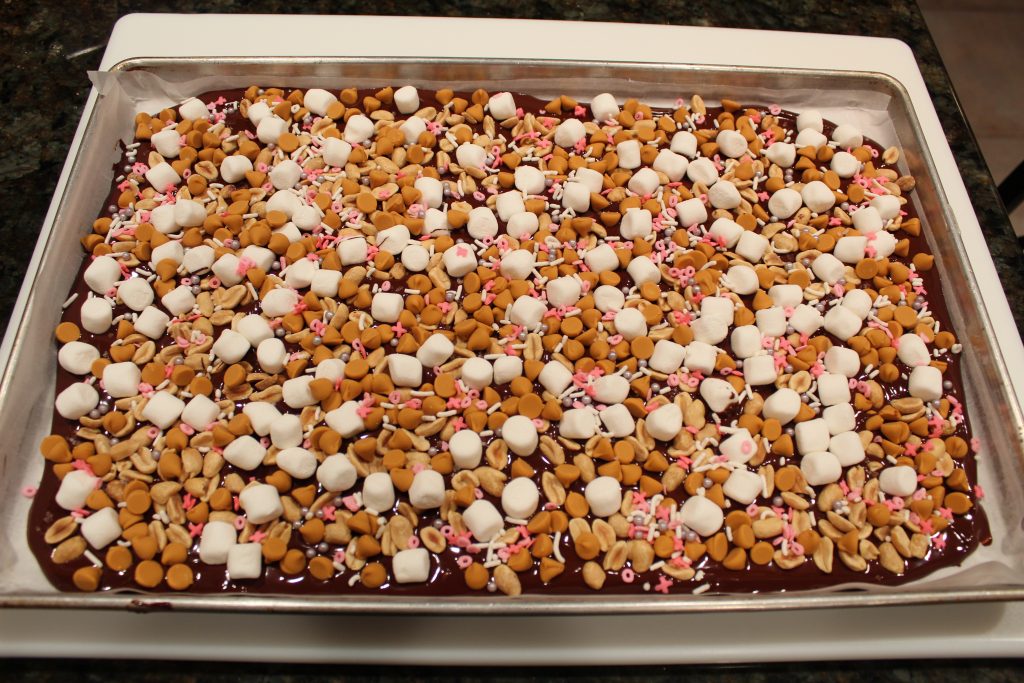
For the dark chocolate I chose roasted peanuts, marshmallows, butterscotch chips, and I finished with a little flaked sea salt. The sweet marshmallows and butterscotch chips are a great contrast against the almost bitter dark chocolate. The roasted peanuts give a great crunch that compliments the softer toppings. The final hit of sea salt at the end helps to bring all of the flavors alive. How much sea salt you use will vary depending on personal preference and whether or not you used salted or unsalted peanuts.
After each addition of toppings take a moment to lightly press them into the chocolate. This will help the toppings adhere to the chocolate as it cools.
When done, leave the bark to completely set before cutting it up. Depending on where you live and the time of year you might be able to let the chocolate set at room temperature. However, if you are like me and you live in south Florida, aka the surface of the sun, I put my bark in the refrigerator to set. After the chocolate has completely set you can either transfer the bark to a cutting board and cut it or just break it into pieces. Remember, it’s bark it is not supposed to be perfect.
A note about this recipe. It makes a lot of bark, I originally developed it for a Valentine’s Day party at work. However, the beauty of chocolate bark is that it can be easily halved. Just remember to adjust down to a smaller sheet pan so that the bark is not to thin.
Ingredients
- Dark Chocolate Bark
24 Ounces of Organic Dark Chocolate Chunks
1 Cup of Roasted Peanuts (Salted or Unsalted)
1 1/2 Cups of Mini Marshmallows
1 Cup of Butterscotch Chips
Flaked Sea Salt, To Taste
Sprinkles, optional
- White Chocolate
24 Ounces of Organic White Chocolate Chips
2 Cups of Salted Pretzels
1 Cup of Dried Cranberries
Sprinkles, optional
Directions
- Dark Chocolate Bark
- Start by cutting 2 13” x 18” rectangles of parchment paper to line 2 sheet pans that have been lightly greased with butter.
- Over a double boiler with simmering water begin to melt half of the chocolate until smooth and silky. Then add the remaining chocolate and remove from the heat. Continue to stir for several minutes until all of the chocolate has melted. If needed, return to the double boiler, with the heat off, for 30 seconds to help the melting process.
- Once the all of the chocolate has fully melted pour it out onto the lined sheet pan and spread with an offset spatula to create an even layer.
- Sprinkle the peanuts evenly over the chocolate and press them in gently.
- Next do the same with the marshmallows and butterscotch chips. Lightly pressing each into the chocolate to help adhere.
- Sprinkle with flaked sea salt. If using salted peanuts use on a little sea salt. If using unsalted peanuts, use a little bit more.
- Finally, top with colorful sprinkles if desired.
- White Chocolate Bark
- Over a double boiler with simmering water begin to melt half of the white chocolate until smooth and silky. Then add the remaining white chocolate and remove from the heat. Continue to stir for several minutes until all of the chocolate has melted. If needed, return to the double boiler, with the heat off, for 30 seconds to help the melting process.
- Once the all of the chocolate has fully melted pour it out onto the second lined sheet pan and spread with an offset spatula to create an even layer.
- Evenly cover with the pretzels and gently press into the chocolate.
- Next, sprinkle the dried cranberries over the top and gently press into the chocolate.
- Finally, top with colorful sprinkles if desired.
- Finishing
- Place both sheet pans in a cool place so that the chocolate can set. Depending on the temperature of your house you will wan to put the sheet pans in the refrigerator for about half an hour.
- Once set, remove a sheet of bark from the sheet pan and either cut or break into pieces of your preferred size.
- Store in an airtight container in a cool dry place for up to 3 days.